Editing
Overview
This section attempts to highlight a few things that you might encounter while editing, or that might simplify your editing experience.
Auto pairs
Auto pairs, where a matching end character is inserted automatically as you type
the starting character, is supported out of the box in Howl. This can save you
some typing as you don’t have to type out the ending character for every
combination of [], {}, etc. If you select some text and type an auto pair
character such as [, auto pairs will enclose the selection in matching start
and end characters. Exactly what pairs are enabled for a buffer is specified
by the buffer’s mode.
In case you find auto pairs annoying, the configuration variable
auto_pair lets you specify whether you want this on or not.
Code blocks
Code blocks are code snippets that are automatically inserted as you type. They differ from completions in that they are inserted without any prompting, and can include more text than a single completion would. As an example, if you were to type the following Lua, and press enter:
function foo() -- <- cursor here
Howl would automatically insert the matching end for you, like so:
function foo()
  -- <- cursor here
end
The configuration variable auto_format lets you specify whether you want this on
or not.
Buffer structure
When editing a larger buffer, it can be challenging to quickly jump to a
specific part of it. The buffer-structure command (bound to alt_s by
default) can provide you with an outline for the current buffer:
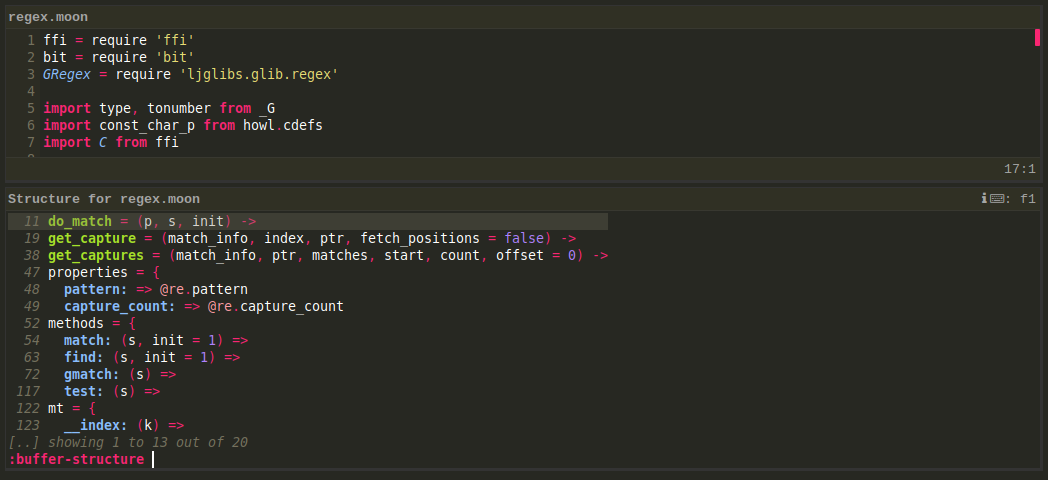
How well this works is depending on the language mode - should the mode not provide custom support for this a general, indentation-based, structure is provided.
Buffer search
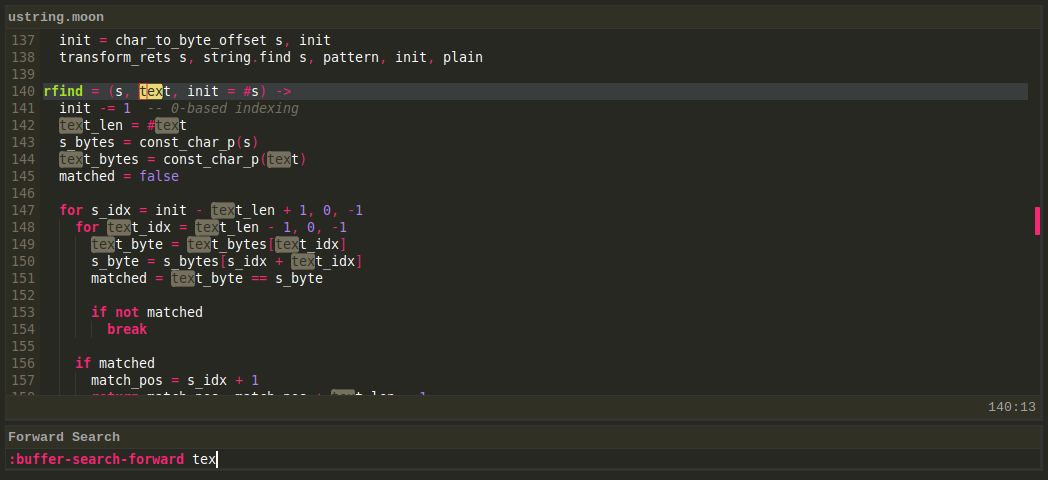
The buffer-search-forward and buffer-search-backward commands (bound to
ctrl_f and ctrl_r respectively) provide an easy way to find exact matches
near the cursor. The visible matches are highlighted in real-time, as you type
your search text.
The match closest to the cursor is focused and you can use the up and down
keys to jump between different matches. Hitting enter moves the cursor to the
focused match.
Whole word search
Looking only for whole word matches can be useful when there happen to be many
sub-string matches that you want to ignore. The buffer-search-word-forward and
buffer-search-word-backward commands (bound to ctrl_period and ctrl_comma)
work similar to the buffer search commands above, but they only match whole
words and they also automatically search for the current word at the cursor.

Note that the match within ‘text_len’ is not highlighted in the screenshot above.
The up and down keys jump between the matches for these commands as well.
Buffer grep
Buffer grep commands are an alternative to the regular buffer-search- commands
for searching the current buffer. These commands search the entire buffer as you
type and display all matching lines in real-time:
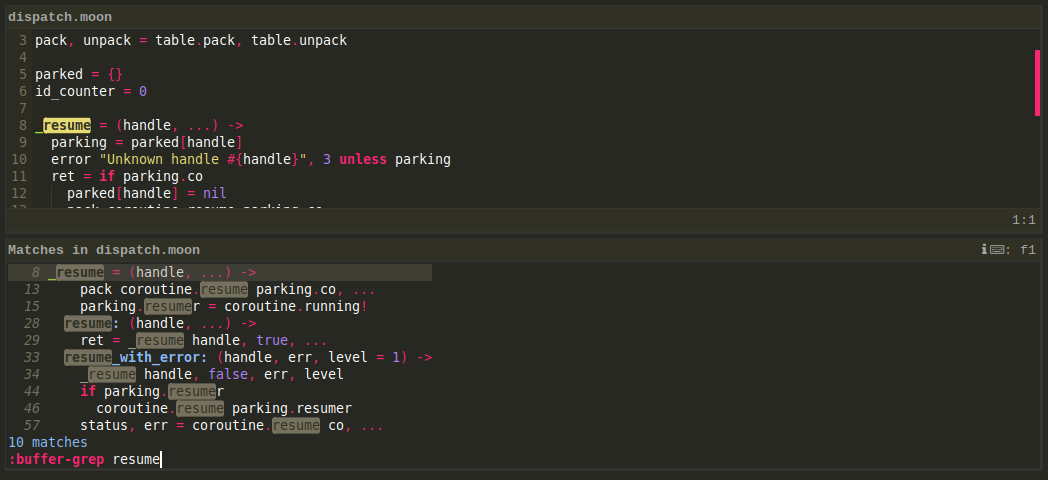
There are three buffer grep commands available for three types of searches:
buffer-grep(bound toctrl_g) shows exact and boundary matches.buffer-grep-regexshows regular expression matches.buffer-grep-exactshows exact matches only.
After invoking buffer-grep, you can press ctrl_g repeatedly to cycle through
all the grep commands.
Replacement
The buffer-replace and buffer-replace-regex commands provide a way to
replace multiple matches of some text or a regular expression in the current
buffer.
The simpler buffer-replace command is used for replacing exact matches of some
text. After invoking buffer-replace, you type the text you want to match (also
called the target text), followed by / (the forward slash is the default
separator), followed by the replacement text. As an example, if you want to
replace all instances of ‘showing’ with ‘visible’, you would invoke
buffer-replace and then type ‘showing/visible’.
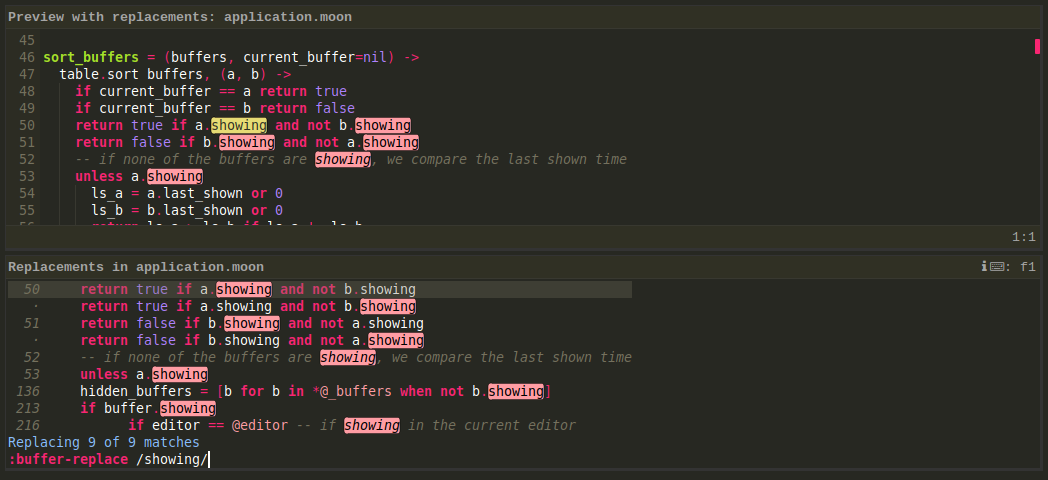
As you type, the displayed preview buffer in the upper panel is updated to show
the effect of your replacement. The lower panel shows all the matches in the
current buffer. You can hide the lower panel by pressing ctrl_s. You can use
the up and down arrow keys to jump between different matches in the preview
buffer. You can press alt_enter to toggle whether or not the currently
focussed match should be replaced with the target - this lets you selectively
preserve some matches from being replaced.
Once you are happy with the replacements as displayed in the preview buffer, you
can press enter to commit the replacements - this updates the original buffer.
If you want to use ‘/’ as part of your target text, you need to use a different
separator. To specify this, type backspace immediately after invoking
buffer-replace - this deletes the automatically inserted leading ‘/’. Now type
a separator of your choice (for example, ‘#’), followed by the target text, the
chosen spearator, and then the replacement text.
The buffer-replace-regex command works similarly to buffer-replace but the
target text is specified as a regular expression and not as an exact match. In
addition, the replacement text can contain back-references to specific parts of
the target. A back-reference is specified as ‘\’ followed by a number. For
example, ‘\1’ refers to the first group in the matched text.
Selecting some text in the editor before invoking a replace command restricts the replacement to the selected text only.
Inspections
Buffer inspections allow you to quickly be notified about potential issues with the code you’re editing. Support for inspections, and the type of inspections available, is of course dependent on the language.
Howl provides a couple of configuration options that allow you to customize how
and if inspections are enabled. First off, we’ll note that the inspection system
allows for two different type of inspections - inspections designed to be run on
idle (as you pause typing) and inspections designed to be run on save (as the
buffer is saved to a file). While this distinction is in some cases arbitrary,
with a particular type of inspection being suitable for running both on save and
on idle, some types of inspections are typically only suitable for running on
save. An obvious example of this is external tools that require an actual file
to be present, but certain inspections could also be so slow to run that you
only want to run them on save for that reason. In keeping with this division
there are two different configuration options for specifying what inspections
should be run for a particular buffer, inspectors_on_idle and
inspectors_on_save. Both of these are lists of named inspectors to run, which
you can customize to add or remove inspectors to run.
The main configuration option controlling the overall behaviour of inspections
is auto_inspect. The default value, ‘on’, means that inspectors are run both
on idle and on save, with the inspectors specified in inspectors_on_idle run
on idle and the inspectors specified in inspectors_on_save run on save. You
can disable automatic run of inspections completely by setting auto_inspect to
‘off’, in which case you have to manually trigger running of inspectors via the
buffer-inspect command. Finally, you can set auto_inspect to save_only,
which will run all inspectors automatically, but only upon save.
When inspections are available you’ll see them displayed in the editor view, similarily to what is show below:
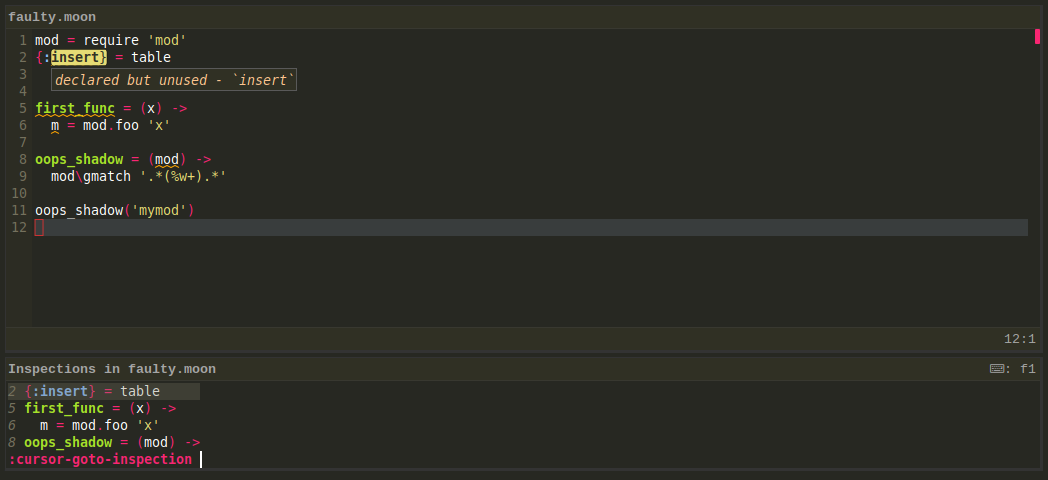
Also shown in the above screenshot is the use of the cursor-goto-inspection
command. This provides a list of all inspections available for the current
buffer, and let’s you easily navigate to them.
Comments
The editor-toggle-comment is bound to ctrl_slash by default, and let’s you
quickly comment and uncomment code.
Clipboard history
Howl manages its own clipboard, and lets you paste cut or copied text other than
the latest text in the clipboard. The editor-paste.. command (bound to
ctrl_shift_v by default) opens a list of previous clips and pastes any
available clip that you choose:

Word wrapping
Howl provides optional support for hard wrapping of text paragraphs. The
fill-paragraph command, bound to alt_q by default, will reflow a paragraph
so that each line is at most as long as the configuration variable
hard_wrap_column specifies.
You can also turn on automatic reflowing of paragraphs if you like, by
customizing the auto_reflow_text configuration variable. This reflow the
current paragraph as you type if needed. For example, the author keeps this in
his ~/.howl/init.moon to enable automatic reflowing for markdown documents:
howl.mode.configure 'markdown', {
  auto_reflow_text: true
}
Unlike most other feature, this is not enabled by default, so you have to explicitly turn it on.
Version control diffs
The version control support in Howl is currently rather spartan, and will be
expanded in future releases. However, if you’re using Git you might find the
vc-diff and vc-diff-file commands useful. The former displays a complete
diff for your entire repository, while the latter displays a diff for the
current file.
Documentation popup
Support for this is dependent on the language mode, and is currently only available for Lua and Moonscript.
The show-doc-at-cursor command, bound to ctrl_q by default, pops up
documentation for the symbol at the cursor if available:

Next: Using multiple views