Getting started
So you’ve installed Howl, but how do you actually use it? (if you haven’t installed it yet, see the instructions here). As you might have read earlier, Howl is rather minimalistic when it comes to the user interface, and it prefers text-based interfaces over the traditional graphical ones. As such, you will not find the typical menu or toolbar that might otherwise help you get started with other applications. In this section we’ll look at the basic concepts of Howl, which will hopefully help you get a better understanding of what Howl is and how you can use it.
The visual components
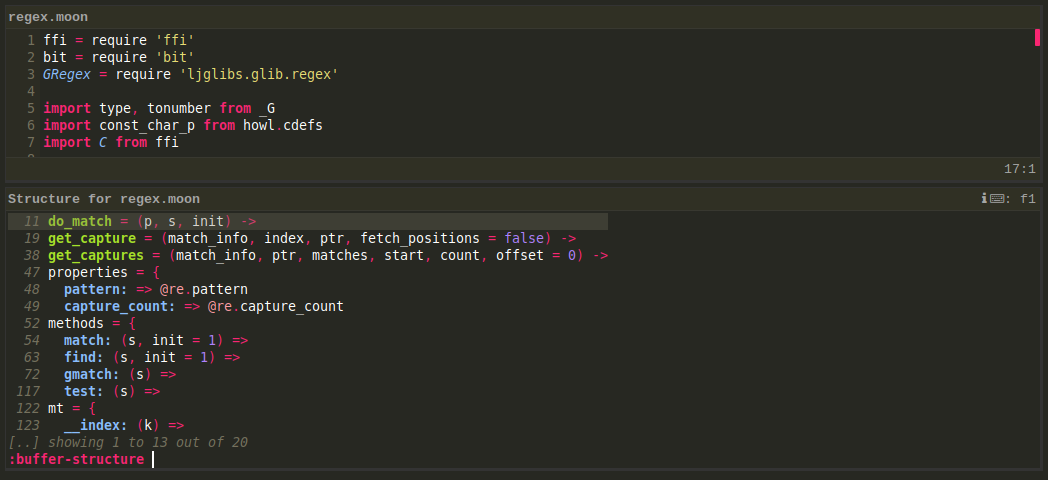
To begin with, let’s examine the basic visual components that you see when you use Howl. Using one of the screenshots as an example:

The above image shows the three basic visual components: a window, a view and the command line.
Windows
When you start up Howl you’ll see one window, containing everything else. You could potentially have multiple windows open for the same Howl instance, even though this is not well-tested at the current time.
Views (Editors)
A window can contain an arbitrary number of views, which are any type of graphical component. Currently there are only type of view available, called an “editor”. Editors are the source editing components you’ll work with most of the time. Editors themselves contain other visual components, such as header and footer components with “indicators” used for displaying for example the current position in the file. An editor always displays exactly one buffer. As can be seen in one of the screen shots it’s possible to have multiple views/editors along each other in the same window.
Command line
The command line component is where you enter your commands. As we will see, commands are the primary way of interacting with Howl, used for mostly anything within Howl. The command line allows you to input these commands, and provides completions as necessary.
Other basic concepts
Buffers
Buffers are what you work with when you edit. Buffers are typically associated
with a file, used for storing the buffer contents on disk. This is not
necessarily the case however, as buffers can just as well exist without any
association to a given file (consider for instance the “Untitled” buffer you see
when you first open Howl without passing any arguments). You can have as many
buffers open as you want, only limited by the amount of available memory. You
can choose to display a given buffer in an existing editor by switching buffers
(via the switch-buffer command).
Modes
All buffers have a mode associated with them. Modes handles everything language/format specific for a certain buffer, such as indentation support, syntax highlighting, etc. Modes are typically assigned to a buffer automatically, e.g. when a file is opened a mode is automatically selected based on the file’s extension, etc.
Key bindings
Key bindings are used for triggering certain actions whenever a certain key combination is entered. Actions are typically commands, but can also be custom functions.
Signals
Signals are fired as a result of different actions within Howl, and provides a generic way of receiving notification. You could for instance register to be notified whenever a buffer was saved.
Entering commands
Manual entry
As said previously, most interactions with Howl will typically be the result of
a command. So let’s gets started with manually entering some basic commands. To
enter you first command, you need to open the command line. In the default keymap,
this is “bound” (mapped) to the alt+x key combination, so enter that to open
the command line. You should now see the command line being opened, awaiting your
command. If you want to, press tab to bring up a completion list of available
commands.
As an example, let’s open a file for editing. Enter open and press space to
open a file. You will automatically be presented with completions. Navigate up
and down the directory tree as needed, using backspace and enter, and press
enter once you’ve found the file you wanted.
When the command line is visible, you can press f1 to display help for the
current command. This shows a popup containing some information about the
current command and key bindings for actions within the command, if any. The
popup can be dismissed by pressing esc.
Using completions
Completions are available within the command line, using the tab key. Completions
are enabled by default for most commands as you will see, but they are not
automatically shown when entering commands. To explicitly request completions of
the available commands, press tab. To cancel completions, press escape. For
commands that want some kind of hierarchal input, such as file commands,
pressing backspace when at the beginning of a prompt allows you to move up in
the hierarchy.
The completion list will automatically filter itself to match whatever you type in the command line.
Using keyboard shortcuts
Manually entering commands is typically not something you want to do for
commands that you invoke often. Unsurprisingly, any command can be bound to a
key combination as well. Howl comes with a default keymap for the most basic
bindings (not complete by any measure, so please suggest missing additions). So
in the previous example, you could have more quickly opened a file using the
ctrl+o key binding. Assigning your own combinations is easy, and will be
discussed later on in the manual. Note: If you bring up the completion list at
the command prompt, you’ll see that it includes the key bindings for the listed
commands when available.
VI users:
Howl ships with a basic VI bundle, which you can activate with the vi-on
command. It’s rather incomplete at this point and will be improved, but contains
at least some of the basic editing functionality.
Next: Configuring Howl
