Working with files & buffers
Opening files
Howl provides a text-oriented interface, and so you want see any traditional
graphical open file dialogs. Instead you’ll open files from the command line,
using commands. First off, the open command lets you navigate the file system
and select a file to open. It’s bound to ctrl_o in the default keymap, and is
also aliased as e for those more comfortable with VI. Triggering that command
opens up the command line prompt and displays the contents of the current
directory, as determined by the current buffer:

Once you’re in the prompt, you can then select the file of your choice. You can
choose the file from the list by manually navigating using the arrow keys,
ctrl_p, ctrl_n, etc., if you want. However, it’s usually much faster to
narrow down the list by typing something that matches the file you want. Just as
with completions (as described in the previous section),
your input string will be matched against the available files using boundary
matching or exact matching. Once the selected file ends up at top, simply press
enter to open it.
If the file you selected is a directory, the list and prompt will update itself
for the selected directory, letting you pick a file there. On the other hand, if
you want to go up a directory level, press backspace. For convenience, if you
type ~/ or / at the start of a prompt, you will be directly transferred to
your home directory and the root directory respectively.
Opening a file within a project
Navigating the file system and selecting a file for opening is all fine and good
for the odd file you want to open. Most of the time however, you’re likely
working within the context of a project of some sort. In that case it can
quickly get tedious to navigate directories up and down, and especially for
larger projects, since you might not even be entirely sure where a desired file
is placed. Fortunately, Howl offers the project-open command to help with
this.
Howl provides simple and light-weight support for projects. In Howl, a project
is currently defined as root directory containing the project files below, with
an optional version control system attached to it. The project-open command
(bound to ctrl_p by default) provides a way of selecting a file to open from
all the files contained in your project. Thanks to the matching capabilities,
this often provides a much faster way of opening files than navigating the
project directory structure do. Below you’ll see an example for the Howl project
itself:
Recursive file listings
When viewing the file listing for a directory within the open command, you can
press ctrl_s to instantly switch to a recursive view. This shows all files
within the directory tree rooted at the current directory allowing you to
quickly find a file within that directory, or in any sub directory. This is
somewhat similar to project-open, however it can be activated in any
directory. To switch back to the regular, single level view, press ctrl_s
again.

Saving buffers
Invoke the save command to save the current buffer to a file. If the buffer
has an associated file, it will get saved to that file, and otherwise you’ll be
prompted for the file name to save the buffer to. The save command is bound to
ctrl_s in the default keymap, and is also aliased as w.
To save a buffer with an associated file to another file, invoke the save-as
command (bound to ctrl_shift_s in the default keymap). There’s also a related
command, save-and-quit, that allows you to save any modified buffers and exit
Howl in one go.
Navigating buffers
While Howl provides the ability to view more than one buffer at a time by supporting multiple open views, you’ll likely have more buffers open than you can fit on your screen, and need ways of viewing different buffers.
Navigating back and forth
As you open buffers, perform edits and move around, Howl tries to keep track of
your previous locations, using its “breadcrumbs” module. This can be used to
quickly move back and forth in your editing history, by using the
navigate-back and navigate-forward commands (the commands are bound to
ctrl_< and ctrl_> by default). The navigate-go-to command (bound to
alt_< by default), lets you select a particular location from all of the
available saved locations.
Note that the navigation is very useful not only as a tool for switching buffers, but for keeping track of previous locations even within the same file. This can be a useful time saver, as it’s quite common to jump around alot in the same file as you search or jump to definitions, etc.
Related configuration options
breadcrumb_limit: The maxium number of locations to save. When this limit is reached new locations will cause the oldest locations to be forgotten.breadcrumb_tolerance: It’s typically not useful to keep consecutive locations saved if they’re very close to each other. The breadcrumbs module merges saved locations if their distance is less than this value.
Switching between open buffers
In order to switch to another buffer of your chosing, you can use the
switch-buffer command (bound to ctrl_b by default):

This let’s you select an open buffer to display in the current view. The list as presented is ordered by access time, thus you’ll see your most recent buffers at the top with less recently used buffers below. As always, you can type to narrow down the list.
Another command that might prove useful to you is
switch-to-last-hidden-buffer. This will switch to the most recently accessed
buffer that is not currently showing in any view, and can thus be useful for
quickly switching between to related files in the same view.
Creating new buffers / files
So what do you do if you just want to create a new buffer, that will eventually
get saved to a new file? Well, there is a new-buffer command available for
this, which will create a new buffer without an associated file, that you can
later save to a named file. This is not bound to any key by default however, and
the reason for that is that it’s not considered that useful. Most of the time
when you want to create a new file, you already know what the file should be
named. And as is the case with some other editors, such as Emacs or Vim, it is
not a requirement for a file to actually exists in order to successfully open
it. Thus, if you want to create a new file whose name you already know, just
open the file using the open command and enter the new name of the file.
If this sounds strange to you, consider that a buffer and a file are two different entities, and that a buffer only has an association with a file. So when you open a non-existing file, you create a new buffer with an association to the specified file, which does not have to exist. As you save the buffer, the file will be created as necessary.
Closing buffers
Closing buffers is normally done with the buffer-close command. However, it’s
quite easy to end up with a large number of open buffers unless you pay
attention to closing old buffers as you’re done with them. Since many users
might find other tasks more agreeable than pruning the list of buffers, Howl
will attempt to automatically close old buffers for you. This is done by closing
those buffers you haven’t bothered to look at for a while (assuming they’re not
modified).
This behaviour is controlled by two configuration variables that you might want to tweak to better suit your editing preferences:
cleanup_min_buffers_open
This specifies the minimum number of buffers that you want open at all times. Howl will never attempt to close buffers if you have less than this number of buffers open. The default is to keep at least 40 buffers open at any given time.
cleanup_close_buffers_after
This specifies the amount of time, in hours, that should have passed since you last viewed a buffer before it should be considered eligible for closing. The default is 24 hours.
Searching files
In the next section, Editing, you can read more about how to search for
content within open buffers. Quite often one wants to search the contents of
files however, to find a specific instance of a certain string such as an
identifier. Howl has some built-in functionality for helping with this without
having to explicitly use external tools in the form of two search commands
catering to two different use cases, project-file-search and
project-file-search-list.
Both commands work the same when it comes to how you perform a search. They will both perform a search within all the current project files for a given term. Whenever the cursor is positioned at something that can be interpreted as a token the search is automatically performed for that particular token, considering only whole-word matches. To search for a specific manually inputted search string you can either issue the command manually from the command line, or you can position the cursor in an empty space.
The matches are always sorted according to your current editing position,
presenting you with what is deemed the most relevant results on top. You can
preview the matches by moving up and down in the list, and choose to visit a
specific location by pressing enter.
Quick search and navigation (project-file-search)
The project-file-search command (bound to ctrl_shift_f by default) will
perform a search within all the current project files, and will present the
results in a list:
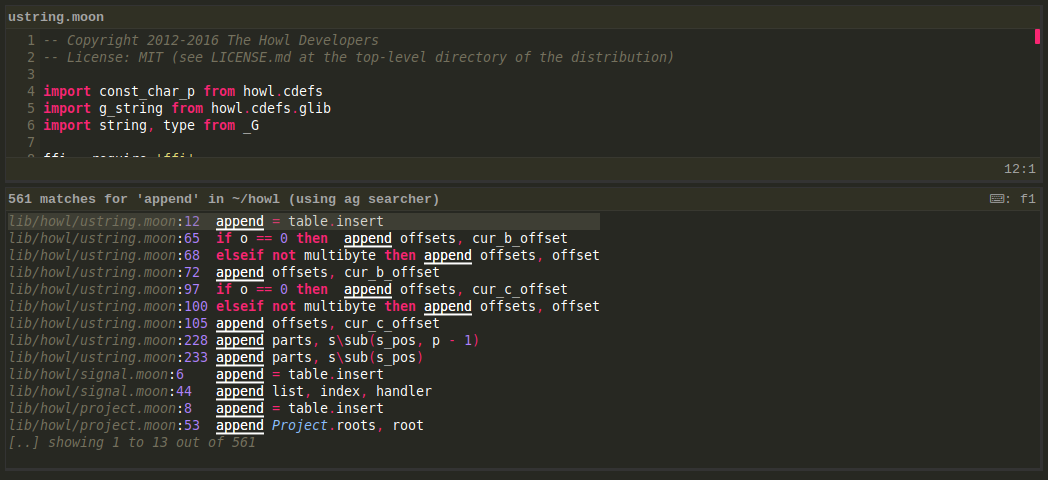
You can preview the matches by moving up and down in the list, and choose to
navigate to a specific location by pressing enter.
Search and processing (project-file-search-list)
The project-file-search-list command (bound to ctrl_shift_g by default) will
perform a search within all the current project files, and will present the
results in a buffer for further processing. This is useful for scenarios where
you need to process one or more of the found occurences, such as refactoring.
You can navigate the buffer as you would do a normal buffer, and you can
navigate to a specific occurence by pressing enter. Any visited items are
marked visually in order to help you keep track of what items you have
processed. You can also manually mark results as processed or not processed by
pressing space on a specific occurence. You can turn on automatic previews for
the search results by pressing p, and turn them off using escape.

The matches are always sorted according to your current editing position,
presenting you with what is deemed the most relevant results on top. You can
preview the matches by moving up and down in the list, and choose to visit a
specific location by pressing enter.
File search configuration
File searching, like everything else in Howl, can be customized. First, there’s
the file_search_hit_display configuration variable that determines how much
bells and whistles should be used when presenting the search hits in the list.
You can tweak this if you want a more spartan display of search hits.
Secondly, the actual searching is performed by one of many possible searcher implementations. Howl ships with support for three different searchers, here listed in priority order:
Ripgrep (rg), a new very fast searcher written in Rust. Requires
rgto be found in the path, or therg_executableconfiguration variable to point to a validrgexecutable.The silver searcher (ag), a very fast searcher originally written as an ack alternative. Requires
agto be found in the path, or theag_executableconfiguration variable to point to a validagexecutable.A native Howl searcher. This is slower than both of the previous alternatives, which are to be preferred, but has the advantage of always being available. It’s actually quite fast as well, but both
rgandagare very fast.
Next: Editing